目次
Plexはパワフルで機能豊富なメディアストリーミングサーバーで、ビデオ、音楽、写真を整理し、どこからでもリモートデバイスをリモートにストリーミングできます。 Linux、Windows、FreeBSD、macOSなど、多くのオペレーティングシステムをサポートしています。 Plexメディアクライアントを使用して、スマートTV、スマートフォン、ストリーミングボックスからPlexサーバーに保存されているメディアにアクセスできます。
Plexには多くの機能があり、その一部を以下に示します。
- ライブTVとDVR。
- モバイル同期。
- クラウド同期。
- プレミアム音楽機能。
- プレミアムフォトライブラリ。
- ハードウェアアクセラレーションストリーミング。
- 保護者による制限。
- カメラのアップロード。
- 帯域幅とトランスコーディングの制限。
このチュートリアルでは、Nginxを備えたPlexメディアサーバーをUbuntu 20.04サーバーのリバースプロキシとしてインストールする方法について説明します。
前提条件
- Ubuntu 20.04を実行しているサーバー。
- rootパスワードが設定されました。
入門
まず、システムパッケージを最新バージョンに更新する必要があります。次のコマンドで更新できます。
apt-get update -yパッケージが更新されたら、次のステップに進むことができます。
まず、Plex公式ウェブサイトからPlexメディアサーバーの最新バージョンをダウンロードする必要があります。次のコマンドでダウンロードできます。
wget https://downloads.plex.tv/plex-media-server-new/1.20.1.3252-a78fef9a9/debian/plexmediaserver_1.20.1.3252-a78fef9a9_amd64.debPlexメディアサーバーパッケージをダウンロードしたら、次のコマンドを使用してインストールできます。
dpkg -i plexmediaserver_1.20.1.3252-a78fef9a9_amd64.debPlexメディアサーバーがインストールされたら、Plexサービスを開始し、次のコマンドを使用してシステムの再起動時に開始できるようにします。
systemctl start plexmediaserver
 systemctl enable plexmediaserver
次に、次のコマンドでPlexサービスのステータスを確認できます。
systemctl status plexmediaserver次の出力が表示されます。
? plexmediaserver.service - Plex Media Server
     Loaded: loaded (/lib/systemd/system/plexmediaserver.service; enabled; vendor preset: enabled)
     Active: active (running) since Sat 2020-09-05 06:48:06 UTC; 17s ago
    Process: 38369 ExecStartPre=/bin/sh -c /usr/bin/test -d "${PLEX_MEDIA_SERVER_APPLICATION_SUPPORT_DIR}" || /bin/mkdir -p "${PLEX_MEDIA_SERV>
   Main PID: 38371 (Plex Media Serv)
      Tasks: 120 (limit: 2353)
     Memory: 215.0M
     CGroup: /system.slice/plexmediaserver.service
             ??38371 /usr/lib/plexmediaserver/Plex Media Server
             ??38405 Plex Plug-in [com.plexapp.system] /usr/lib/plexmediaserver/Resources/Plug-ins-a78fef9a9/Framework.bundle/Contents/Resourc>
             ??38451 /usr/lib/plexmediaserver/Plex Tuner Service /usr/lib/plexmediaserver/Resources/Tuner/Private /usr/lib/plexmediaserver/Res>
             ??38474 Plex Plug-in [com.plexapp.agents.plexthememusic] /usr/lib/plexmediaserver/Resources/Plug-ins-a78fef9a9/Framework.bundle/C>
             ??38477 Plex Plug-in [com.plexapp.agents.themoviedb] /usr/lib/plexmediaserver/Resources/Plug-ins-a78fef9a9/Framework.bundle/Conte>
             ??38533 Plex Plug-in [org.musicbrainz.agents.music] /usr/lib/plexmediaserver/Resources/Plug-ins-a78fef9a9/Framework.bundle/Conten>
             ??38544 Plex Plug-in [com.plexapp.agents.thetvdb] /usr/lib/plexmediaserver/Resources/Plug-ins-a78fef9a9/Framework.bundle/Contents>
             ??38638 Plex Plug-in [com.plexapp.agents.opensubtitles] /usr/lib/plexmediaserver/Resources/Plug-ins-a78fef9a9/Framework.bundle/Co>
             ??38710 Plex Plug-in [com.plexapp.agents.fanarttv] /usr/lib/plexmediaserver/Resources/Plug-ins-a78fef9a9/Framework.bundle/Content>

Sep 05 06:48:06 ubuntu2004 systemd[1]: Starting Plex Media Server...
Sep 05 06:48:06 ubuntu2004 systemd[1]: Started Plex Media Server.
この時点で、Plexメディアサーバーが起動し、ポート32400でリッスンします。次のコマンドで確認できます。
ss -lnpt | grep Plex次の出力が表示されます。
LISTEN    0         128              127.0.0.1:39851            0.0.0.0:*        users:(("Plex Script Hos",pid=38739,fd=4))
LISTEN    0         128              127.0.0.1:46031            0.0.0.0:*        users:(("Plex Script Hos",pid=38779,fd=4))
LISTEN    0         1024             127.0.0.1:32401            0.0.0.0:*        users:(("Plex Media Serv",pid=38371,fd=61))
LISTEN    0         128              127.0.0.1:44661            0.0.0.0:*        users:(("Plex Script Hos",pid=38533,fd=4))
LISTEN    0         128              127.0.0.1:32600            0.0.0.0:*        users:(("Plex Tuner Serv",pid=38451,fd=13))
LISTEN    0         128              127.0.0.1:36637            0.0.0.0:*        users:(("Plex Script Hos",pid=38544,fd=4))
LISTEN    0         128              127.0.0.1:42973            0.0.0.0:*        users:(("Plex Script Hos",pid=38405,fd=10))
LISTEN    0         128              127.0.0.1:38467            0.0.0.0:*        users:(("Plex Script Hos",pid=38824,fd=4))
LISTEN    0         128              127.0.0.1:40035            0.0.0.0:*        users:(("Plex Script Hos",pid=38477,fd=4))
LISTEN    0         1024                     *:32400                  *:*        users:(("Plex Media Serv",pid=38371,fd=60))
完了したら、次のステップに進むことができます。
デフォルトでは、PlexメディアサーバーリポジトリはAPTで無効になっています。したがって、APTコマンドを使用してPlexメディアサーバーを更新できるように、有効にすることをお勧めします。次のファイルを編集して有効にできます。
nano /etc/apt/sources.list.d/plexmediaserver.list次の行のコメントを外します。
deb https://downloads.plex.tv/repo/deb/ public main
ファイルを保存して閉じ、次のコマンドでPlex GPGキーを追加します。
wget -q https://downloads.plex.tv/plex-keys/PlexSign.key -O - | apt-key add -次に、次のコマンドを使用してリポジトリを更新し、変更を適用します。
apt-get update -yリポジトリが更新されたら、次のステップに進むことができます。
PlexのNginxを構成する
次に、PlexのリバースプロキシとしてNginxをインストールして構成することをお勧めします。したがって、ポート80を使用してPlexメディアサーバーにアクセスできます。
最初に、次のコマンドを使用してNginx Webサーバーをインストールします。
apt-get install nginx -yNginx Webサーバーがインストールされたら、次のコマンドで新しいNginx仮想ホスト構成ファイルを作成します。
nano /etc/nginx/sites-available/plex.conf次の行を追加します。
upstream plex_backend {
        server 127.0.0.1:32400;
        keepalive 32;
}

server {
        listen 80;
        server_name plex.example.com;

        send_timeout 100m; #Some players don't reopen a socket and playback stops totally instead of resuming after an extended pause (e.g. Ch$

       	#Plex has A LOT of javascript, xml and html. This helps a lot, but if it causes playback issues with devices turn it off. (Haven't enc$
        gzip on;
        gzip_vary on;
        gzip_min_length 1000;
        gzip_proxied any;
        gzip_types text/plain text/css text/xml application/xml text/javascript application/x-javascript image/svg+xml;
        gzip_disable "MSIE [1-6]\.";

       	#Nginx default client_max_body_size is 1MB, which breaks Camera Upload feature from the phones.
       	#Increasing the limit fixes the issue. Anyhow, if 4K videos are expected to be uploaded, the size might need to be increased even more
        client_max_body_size 100M;

       	#Forward real ip and host to Plex
        proxy_set_header Host $host;
        proxy_set_header X-Real-IP $remote_addr;
        proxy_set_header X-Forwarded-For $proxy_add_x_forwarded_for;
        proxy_set_header X-Forwarded-Proto $scheme;
        proxy_set_header Sec-WebSocket-Extensions $http_sec_websocket_extensions;
        proxy_set_header Sec-WebSocket-Key $http_sec_websocket_key;
        proxy_set_header Sec-WebSocket-Version $http_sec_websocket_version;
       	#Websockets
        proxy_http_version 1.1;
        proxy_set_header Upgrade $http_upgrade;
        proxy_set_header Connection "Upgrade";

       	#Buffering off send to the client as soon as the data is received from Plex.
        proxy_redirect off;
        proxy_buffering off;

        location / {
                proxy_pass http://plex_backend;
        }
}
ファイルを保存して閉じ、次のコマンドで構文エラーがないかNginxを確認します。
nginx -t次の出力が表示されます。
nginx: the configuration file /etc/nginx/nginx.conf syntax is ok
nginx: configuration file /etc/nginx/nginx.conf test is successful
次に、次のコマンドでNginx仮想ホスト構成ファイルを有効にします。 広告
ln -s nano /etc/nginx/sites-available/plex.conf /etc/nginx/sites-enabled/最後に、Nginxサービスを再起動して構成の変更を適用します。
systemctl restart nginx次のコマンドでNginxのステータスを確認できます。
systemctl status nginx次の出力が表示されます。
? nginx.service - A high performance web server and a reverse proxy server
     Loaded: loaded (/lib/systemd/system/nginx.service; enabled; vendor preset: enabled)
     Active: active (running) since Sat 2020-09-05 06:57:20 UTC; 1min 47s ago
       Docs: man:nginx(8)
    Process: 40059 ExecStartPre=/usr/sbin/nginx -t -q -g daemon on; master_process on; (code=exited, status=0/SUCCESS)
    Process: 40070 ExecStart=/usr/sbin/nginx -g daemon on; master_process on; (code=exited, status=0/SUCCESS)
   Main PID: 40072 (nginx)
      Tasks: 3 (limit: 2353)
     Memory: 3.6M
     CGroup: /system.slice/nginx.service
             ??40072 nginx: master process /usr/sbin/nginx -g daemon on; master_process on;
             ??40073 nginx: worker process
             ??40074 nginx: worker process

Sep 05 06:57:20 ubuntu2004 systemd[1]: Starting A high performance web server and a reverse proxy server...
Sep 05 06:57:20 ubuntu2004 systemd[1]: Started A high performance web server and a reverse proxy server.
完了したら、次のステップに進むことができます。
この時点で、Plexメディアサービスがインストールされ、Nginxで構成されます。次に、Webブラウザーを開き、URL http://plex.example.comを使用してPlexメディアサーバーにアクセスします。次のページが表示されます。
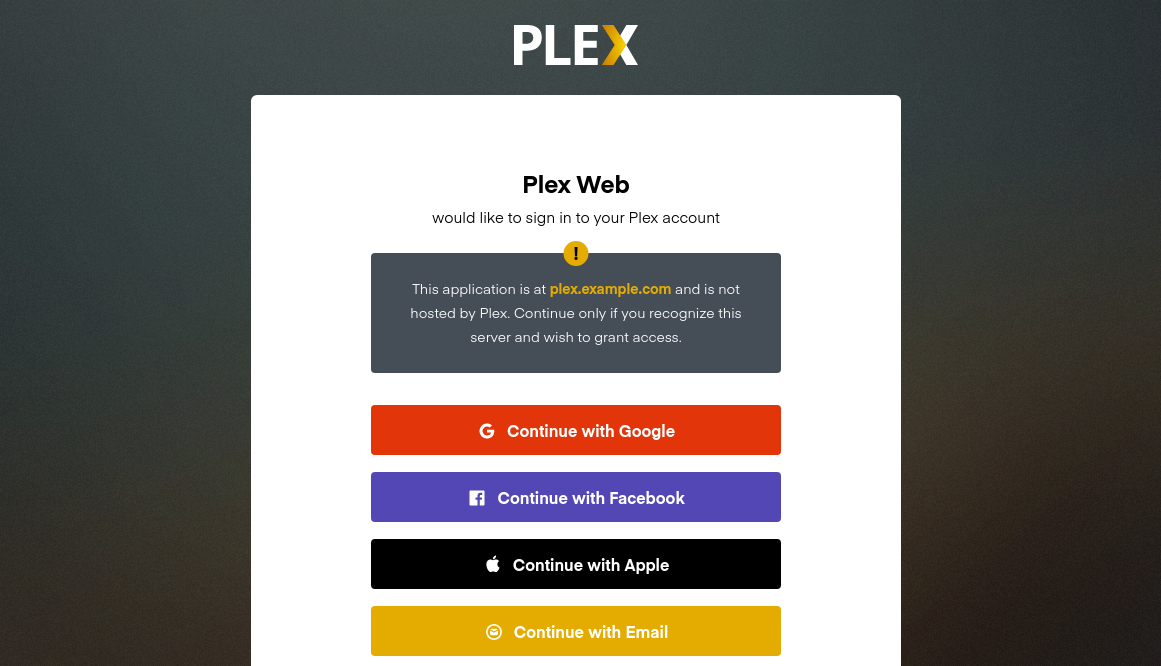
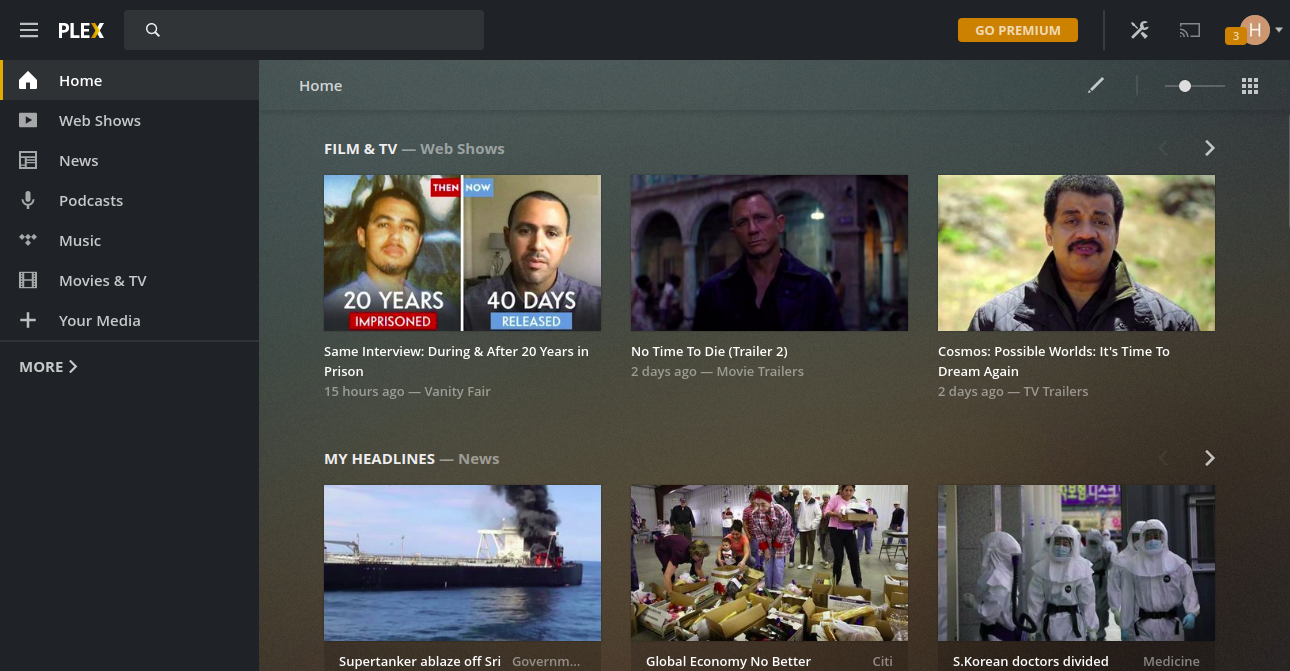
次に、 GoogleまたはFacebookアカウントでログインします。次のページにPlexメディアサーバーダッシュボードが表示されます。
Let’s Encrypt SSLによるセキュアプレックス
次に、Let’s Encrypt SSLでPlexを保護することをお勧めします。まず、SSLをインストールして管理するには、サーバーにCertbot Let’s Encryptクライアントをインストールする必要があります。次のコマンドでインストールできます。
apt-get install python3-certbot-nginx -yCertbotをインストールしたら、次のコマンドを実行してドメインにLet’s Encrypt SSLをインストールします。 広告
certbot --nginx -d plex.example.com以下に示すように、有効なメールアドレスを入力して利用規約に同意するよう求められます。
Saving debug log to /var/log/letsencrypt/letsencrypt.log
Plugins selected: Authenticator nginx, Installer nginx
Enter email address (used for urgent renewal and security notices) (Enter 'c' to
cancel): [email protected]

- - - - - - - - - - - - - - - - - - - - - - - - - - - - - - - - - - - - - - - -
Please read the Terms of Service at
https://letsencrypt.org/documents/LE-SA-v1.2-November-15-2017.pdf. You must
agree in order to register with the ACME server at
https://acme-v02.api.letsencrypt.org/directory
- - - - - - - - - - - - - - - - - - - - - - - - - - - - - - - - - - - - - - - -
(A)gree/(C)ancel: A

- - - - - - - - - - - - - - - - - - - - - - - - - - - - - - - - - - - - - - - -
Would you be willing to share your email address with the Electronic Frontier
Foundation, a founding partner of the Let's Encrypt project and the non-profit
organization that develops Certbot? We'd like to send you email about our work
encrypting the web, EFF news, campaigns, and ways to support digital freedom.
- - - - - - - - - - - - - - - - - - - - - - - - - - - - - - - - - - - - - - - -
(Y)es/(N)o: Y
Obtaining a new certificate
Performing the following challenges:
http-01 challenge for plex.example.com
Waiting for verification...
Cleaning up challenges
Deploying Certificate to VirtualHost /etc/nginx/sites-enabled/plex.conf
次に、以下に示すように、HTTPトラフィックをHTTPSにリダイレクトするかどうかを選択します。
- - - - - - - - - - - - - - - - - - - - - - - - - - - - - - - - - - - - - - - -
1: No redirect - Make no further changes to the webserver configuration.
2: Redirect - Make all requests redirect to secure HTTPS access. Choose this for
new sites, or if you're confident your site works on HTTPS. You can undo this
change by editing your web server's configuration.
- - - - - - - - - - - - - - - - - - - - - - - - - - - - - - - - - - - - - - - -
Select the appropriate number [1-2] then [enter] (press 'c' to cancel): 2
2と入力してEnterキーを押し、インストールを終了します。次の出力が表示されます。
Redirecting all traffic on port 80 to ssl in /etc/nginx/sites-enabled/plex.conf

- - - - - - - - - - - - - - - - - - - - - - - - - - - - - - - - - - - - - - - -
Congratulations! You have successfully enabled https://plex.example.com

You should test your configuration at:
https://www.ssllabs.com/ssltest/analyze.html?d=plex.example.com
- - - - - - - - - - - - - - - - - - - - - - - - - - - - - - - - - - - - - - - -

IMPORTANT NOTES:
 - Congratulations! Your certificate and chain have been saved at:
   /etc/letsencrypt/live/plex.example.com/fullchain.pem
   Your key file has been saved at:
   /etc/letsencrypt/live/plex.example.com/privkey.pem
   Your cert will expire on 2020-10-30. To obtain a new or tweaked
   version of this certificate in the future, simply run certbot again
   with the "certonly" option. To non-interactively renew *all* of
   your certificates, run "certbot renew"
 - Your account credentials have been saved in your Certbot
   configuration directory at /etc/letsencrypt. You should make a
   secure backup of this folder now. This configuration directory will
   also contain certificates and private keys obtained by Certbot so
   making regular backups of this folder is ideal.
 - If you like Certbot, please consider supporting our work by:

   Donating to ISRG / Let's Encrypt:   https://letsencrypt.org/donate
   Donating to EFF:                    https://eff.org/donate-le

 - We were unable to subscribe you the EFF mailing list because your
   e-mail address appears to be invalid. You can try again later by
   visiting https://act.eff.org.
これで、URL https://plex.example.comを使用してPlexメディアサーバーに安全にアクセスできます。
結論
おめでとう! Ubuntu 20.04サーバーにリバースプロキシとしてNginxを備えたPlexメディアサーバーを正常にインストールしました。メディア、音楽、写真をアップロードして、スマートフォン、テレビ、その他のストリーミングボックスからアクセスできるようになりました。ご不明な点がございましたら、お気軽にお問い合わせください。