PerconaサーバーはMySQLサーバーのフォークです。 これは完全に互換性があり、OracleMySQLの代わりになります。 Percona Serverは、ワークロードに優れたパフォーマンス、スケーラビリティ、およびインストルメンテーションを提供するために、何千もの企業で使用されています。 AWS、Google Cloud、Azureなどを含む多くのクラウドプロバイダーと互換性があります。 48を超えるCPUコアを拡張でき、1秒あたり数十万のI / O操作を実現します。
このチュートリアルでは、Ubuntu20.04にPerconaサーバーをインストールする方法を紹介します。
前提条件
- Ubuntu20.04を実行しているサーバー。
- サーバーにrootパスワードが設定されています。
入門
開始する前に、システムパッケージを最新バージョンに更新する必要があります。 次のコマンドを使用して、それらすべてを更新できます。
apt-get update -yすべてのパッケージが更新されたら、次のコマンドを使用して他の必要な依存関係をインストールします。
apt-get install wget unzip gnupg2 -yすべての依存関係がインストールされたら、次のステップに進むことができます。
Perconaリポジトリを追加する
デフォルトでは、PerconaはUbuntuのデフォルトリポジトリに含まれていません。 そのため、Perconaリポジトリをシステムに追加する必要があります。
まず、次のコマンドを使用してPerconaリリースdebファイルをダウンロードします。
wget https://repo.percona.com/apt/percona-release_latest.$(lsb_release -sc)_all.debダウンロードが完了したら、次のコマンドを使用してダウンロードしたファイルをインストールします。
dpkg -i percona-release_latest.focal_all.deb次の出力が得られるはずです。
Selecting previously unselected package percona-release.
(Reading database ... 87734 files and directories currently installed.)
Preparing to unpack percona-release_latest.focal_all.deb ...
Unpacking percona-release (1.0-25.generic) ...
Setting up percona-release (1.0-25.generic) ...
* Enabling the Percona Original repository
<*> All done!
==> Please run "apt-get update" to apply changes
* Enabling the Percona Release repository
<*> All done!
==> Please run "apt-get update" to apply changes
The percona-release package now contains a percona-release script that can enable additional repositories for our newer products.

For example, to enable the Percona Server 8.0 repository use:

  percona-release setup ps80

Note: To avoid conflicts with older product versions, the percona-release setup command may disable our original repository for some products.

For more information, please visit:
  https://www.percona.com/doc/percona-repo-config/percona-release.html
Perconaサーバーをインストールする
Perconaリポジトリは多くのツールを提供します。 このセクションでは、Percona8をインストールします。次のコマンドでインストールできます。
percona-release setup ps80
apt-get install percona-server-server
インストール中に、以下に示すようにルートパスワードを設定するように求められます。


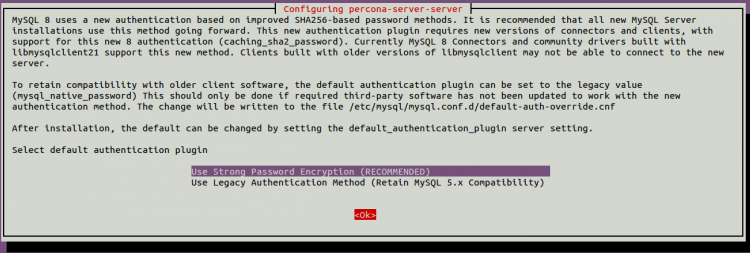
ルートパスワードを設定し、 入る。 以下に示すように、認証プラグインを選択するように求められます。

最初のオプションを選択してヒット 入る Perconaサーバーをインストールします。
結論
おめでとう! これで、PerconaサーバーがUbuntu20.04に正常にインストールされました。 これで、追加機能を備えたプロジェクトでPerconaを使用できます。
Hope this helps!