目次
Angularは、モバイルおよびWebアプリケーションの構築に使用される最も人気のあるフレームワークです。 Angularは、Googleと大規模な個人コミュニティによって開発されたオープンソースのWebアプリケーションフレームワークです。現在、Angular 10はインストールに使用できる最新バージョンです。このチュートリアルは、Ubuntu 20.04 LinuxシステムにAngular CLIノードモジュールをインストールするのに役立ちます。
ステップ1 – Node.jsのインストール
NVMは、Linuxシステムにnode.jsをインストールおよび管理するためのコマンドラインツールです。したがって、最初にシステムにnvmをインストールする必要があります。 Node.jsをインストールする必要があるユーザーでシステムにログインし、以下のコマンドを実行してnvmをインストールします。
curl https://raw.githubusercontent.com/creationix/nvm/master/install.sh | bashその後、システムに任意のバージョンのノードをインストールできます。単一のシステムに複数のノードバージョンをインストールすることもできます。以下のコマンドを実行して環境をロードし、最新のnode.jsバージョンをインストールします。
source ~/.bashrcnvm install node
上記のコマンドは、システムにインストールされているノードとnpmのバージョンを表示します。
ステップ2 – Angular CLIのインストール
システムにnode.jsとnpmをインストールした後、次のコマンドを使用してシステムにAngular CLIツールをインストールします。
npm install -g @angular/cliAngular CLIの最新バージョンがUbuntu Linuxシステムにインストールされます。マシンに古いAngularバージョンが必要な場合があります。特定のAngularバージョンをインストールするには、次のようにバージョン番号を付けてコマンドを実行します。
npm install -g @angular/cli@8 #Angular 8npm install -g @angular/cli@9 #Angular 9npm install -g @angular/cli@10 #Angular 10
上記の-gコマンドを使用すると、Angular CLIツールがグローバルにインストールされます。そのため、システム上のすべてのユーザーとアプリケーションがアクセスできます。 Angular CLIは、コマンドライン操作に使用されるコマンドng提供します。システムにインストールされているngのバージョンを確認してみましょう。
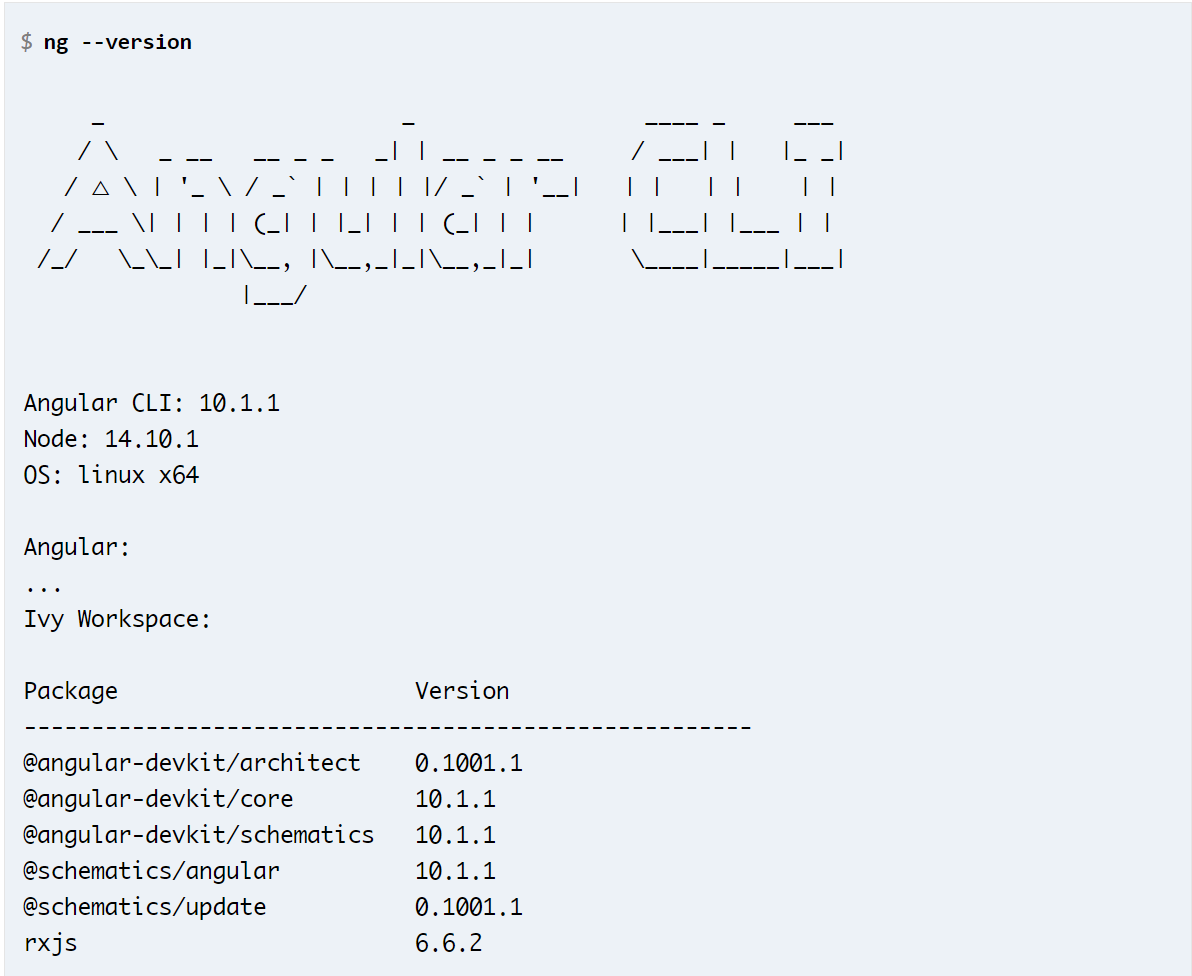
Angularコマンドラインインターフェイスがシステムにインストールされています。既存のアプリケーションの場合、作業を開始し、残りの記事を無視できます。
次の手順に従って、システムに新しいAngularアプリケーションを作成します。
ステップ3 –新しいAngularアプリケーションの作成
ngコマンドを使用して、新しい角度アプリケーションを作成できます。 Angularコマンドラインツールを使用して、hello-worldという名前のアプリケーションを作成します。ターミナルで以下のコマンドを実行します:
ng new hello-world出力:
? Would you like to add Angular routing? Yes ? Which stylesheet format would you like to use? CSS CREATE hello-world/README.md (1028 bytes) CREATE hello-world/.editorconfig (274 bytes) CREATE hello-world/.gitignore (631 bytes) CREATE hello-world/angular.json (3606 bytes) CREATE hello-world/package.json (1254 bytes) CREATE hello-world/tsconfig.json (458 bytes) CREATE hello-world/tslint.json (3185 bytes) CREATE hello-world/.browserslistrc (853 bytes) CREATE hello-world/karma.conf.js (1023 bytes) CREATE hello-world/tsconfig.app.json (287 bytes) CREATE hello-world/tsconfig.spec.json (333 bytes) CREATE hello-world/src/favicon.ico (948 bytes) CREATE hello-world/src/index.html (296 bytes) CREATE hello-world/src/main.ts (372 bytes) CREATE hello-world/src/polyfills.ts (2835 bytes) CREATE hello-world/src/styles.css (80 bytes) CREATE hello-world/src/test.ts (753 bytes) CREATE hello-world/src/assets/.gitkeep (0 bytes) CREATE hello-world/src/environments/environment.prod.ts (51 bytes) CREATE hello-world/src/environments/environment.ts (662 bytes) CREATE hello-world/src/app/app-routing.module.ts (245 bytes) CREATE hello-world/src/app/app.module.ts (393 bytes) CREATE hello-world/src/app/app.component.css (0 bytes) CREATE hello-world/src/app/app.component.html (25757 bytes) CREATE hello-world/src/app/app.component.spec.ts (1072 bytes) CREATE hello-world/src/app/app.component.ts (215 bytes) CREATE hello-world/e2e/protractor.conf.js (869 bytes) CREATE hello-world/e2e/tsconfig.json (294 bytes) CREATE hello-world/e2e/src/app.e2e-spec.ts (644 bytes) CREATE hello-world/e2e/src/app.po.ts (301 bytes)Packages installed successfully. Successfully initialized git.
これにより、現在のディレクトリにhello-worldという名前のディレクトリが作成され、角度付きアプリケーションに必要なすべてのファイルが作成されます。
ステップ4 – Angularアプリケーションを提供する
基本的なAngularアプリケーションを提供する準備が整いました。ディレクトリhello-worldに切り替え、ng serveコマンドを使用して角度アプリケーションを実行します。
cd hello-worldng serve
デフォルトでは、角度アプリケーションはポート4200で実行されます。次のように、ポート4200でシステムにアクセスして角度アプリケーションを開くことができます。
- http://localhost:4200
–hostおよび–portコマンドライン引数を指定することにより、Angularアプリケーションを実行するためのホストとポートを変更できます。
ng serve --host 0.0.0.0 --port 8080IPアドレス0.0.0.0はすべてのインターフェースでリッスンし、パブリックにアクセスできます。
結論
このチュートリアルでは、ノードパッケージとして角度コマンドラインユーティリティをインストールする方法を学びました。このチュートリアルは、新しい角度アプリケーションの作成にも役立ちました。さて、 こちらをご覧 Apacheサーバの後ろの角アプリケーションを構成します。